


Penalty Kill: Retreating Diamond Neutral Zone Forecheck
A primer on the 1-3 penalty kill forecheck in the neutral zone

Over time, many tactics come in and out of favor. There is a ton of R&D (rob and do) around the NHL. Many teams have migrated to the “Wedge+1” in-zone penalty kill, with a few teams starting to look to the diamond again. What is old is new again, as they say.
The last time we checked in with the PK, we dove into the 2021-22 Toronto Maples Leafs. The modern-day penalty kill neutral zone forecheck (NZFC) has seen a similar evolution. Most teams at the moment tend to use the “Retreating Diamond.”
Early this season, there have been a ton of PK counterattack goals from the retreating diamond (looking at you, Carolina Hurricanes).
Penalty Kill
When on the PK, there is a natural numerical disadvantage. The team on the Power Play (PP) has more players and the killing team must search for situations in which they can have an advantage, or at least an even situation, where they can attack to disrupt the PP.
We’ve covered how teams use “Pressure Keys” to start a pressuring movement. For the most part, those are within the defending zone.
Further up the ice, we see defending PK teams using the NZ as a place to make a stand and find ways to improve their odds of success.
NZFC
The neutral zone is a space where the rulebook lends itself to the defending team via the icing and offside rules. Once in the zone, there is more room to work with and the offense can spread out the spacing in the neutral zone, spacing favors the defenders.
From legendary soccer/football coach Johan Cruyff:
"It's not a question if I'm a good or bad [defender], it's the size, it's the meters of what you've got to defend.
Defending is how much space I have to defend.“
Naturally, players and teams need to organize a defense to “Challenge at the lines” and shrink the space that defenders have to defend.
Retreating Diamond
What is the retreating diamond? Simple, it’s a diamond... that is retreating!
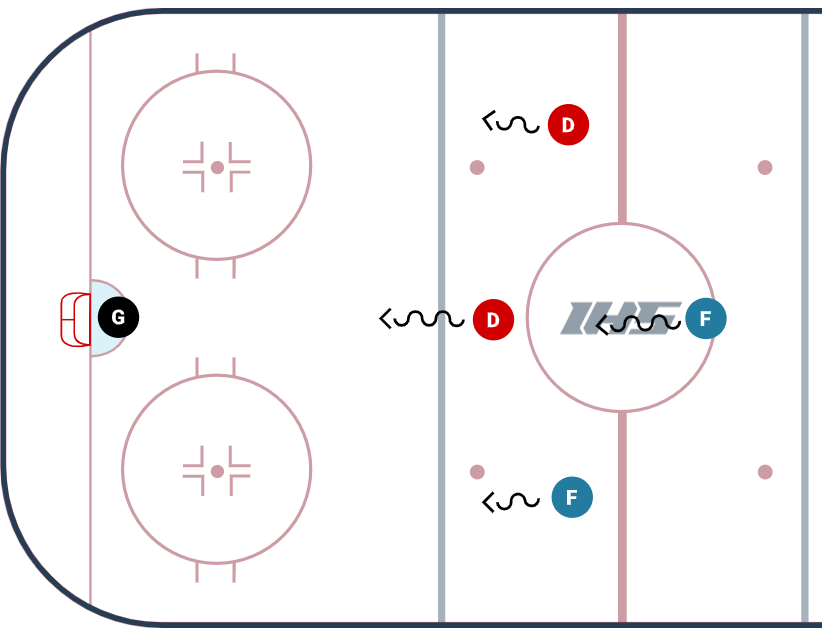
Front = Force the play wide to limit space while forcing into a teammate.
Left/Right = Step up if possible and force the play at the red line or blue line. If unable to step up to pressure, contain the play in a tight area.
Middle = Coverage if teammates get beat or have a head start to retrieve any dumped/chipped pucks.
When done well, this causes a bunch of turnovers to turn numerically disadvantaged defense into offense.
Related: What is the Dot Line and Middle Ice?
Case Study #1: The Carolina Hurricanes
The Hurricanes have had one of the top PKs in the NHL over the past few seasons. They were one of, if not the first, to use the modern Wedge +1. Simply put, they apply massive amounts of pressure. All of the below PK goal videos are from this season.


Starting at the dot line, then a perfectly executed pokecheck for the turnover and a quick strike the other way.

Case Study #2: Minnesota Wild
The Wild are another team that deploys the Retreating Diamond NZFC. Power Plays now understand what the PK is attempting to do. If lacking focus or going through the motions, a smart PK will jump to pressure the attacking PP at a surprising time. Don’t sleep or the PK might surprise you with its timing.

The same power play and 15 seconds later…

We see the PK staying positionally sound on the dot line, then attacking/jumping to cause a turnover and immediate sprint up ice.

The pressure doesn’t end once the opposition team enters the attacking zone. The killers continue to pressure to cut off passing options. This is particularly dangerous when the attacking team fails to gain depth upon entry.

Takeaways: Use the natural barriers to your advantage, position smartly, pokecheck well, pressure at surprising times, and attack quickly.
Further Reading